I gave up all efforts in finding a pair of leather grips for Ralph. Finding something simple and discreet was impossible. Everywhere I looked I kept coming across weird shapes or weird seams or weird logos. The only kind of grips I managed to find that exactly fit my “specs” of simple, plain and logoless were the “Elkhide Sewn-on City Bike Grips” by Velo Orange. However, I was not convinced that their width would be enough in my case (and as it proved, it wouldn’t).
So I decided to make my own.
I have to credit Velo Orange for their stitching instructions though, which I followed with great success.
You will need:
– a scrap of leather enough to give you two rectangular pieces of about 15x10cm (you will end up using less. I made mine with two 12x8cm pieces. I sourced the scrap in an upholstery store for next to nothing.)
– a roll of cotton tape
– a ruler (a triangle is even better)
– an exacto knife
– a marker
– a vernier caliper
– an awl
– a cutting surface
– strong thread
– two needles
Begin with loosening the shifters and brake levers and sliding them towards the stem.
IMPORTANT: Do not remove your shifters/levers from the handlebars. Most shifters/levers are mountable from the edge of the handlebars. If you remove them and then start making the grips, sooner or later you will slap yourself on the forehead and have to start over from the beginning.
Place your hands on your handlebars and decide how long you want your grips to be. Measure this distance. Alternatively, measure the length of a pair of grips you own or google around to find the length of a pair of grips you like.

Apply a layer of tape to cover this length minus about 2mm. For instance if you wish your grips to be 12cm long, start applying the tape 11.8mm from the edge of the handlebars. On each round pull at a tight angle to create nice overlaps. This layer will add friction between the leather grips and the handlebars (in order to eliminate slippage) and it will offer extra padding. It will also add a very subtle wave to the leather surface which is a nice touch (and nice to touch).

CRITICAL: Now you need to determine the correct width of the grip. Wrap a small piece of leather (it can be as narrow as 1cm and as short as 7cm) around the tape and measure the total width with the vernier caliper. It was 2.6cm in my case. Multiplying this by pi (3.14) gives you the circumference of the handlebars with both layers of tape and leather. In my case 2.6cm x 3.14 = 8.16cm. I decided to go with a bit less (8cm) since leather will stretch a bit when tightened.
Knowing the length and width of your grips, flip the leather scrap and mark it on its back side.

Cut with the exacto knife.
TIP: The leather has a tendency to pull when being cut. So, cut intermittently. Otherwise you might not get a straight line. I also thought to use a rolling pizza cutter, but mine did not work. If yours is sharper than the ikea variety, you may give it a try. First, make sure to test it on a small part you are not going to use.

Draw a parallel line about 5mm from the edge of the long side. Repeat for the other long side. On these lines mark the 5mm point and then mark every 10mm. E.g. for a 12cm long grip, mark the 0.5cm , 1.5cm, 2.5cm, …, 11.5cm points.

Using an awl or another sharp pointy tool (a fork with all tips bent but one, maybe?) punch holes on the marks.
TIP: Slightly widening the wholes from the front side will make stitching easier.
Flip your handlebars upside down (unless you want the stitches to be on top!).
Cut a long piece of thread and pass a needle through each side.
TIP: Make sure you have plenty of thread when you start. Better having excess thread in the end, rather than realizing it is not enough when you are halfway through. I used a 2m long thread for each grip!
I started stitching from the bar end rather than the stem end (which is mentioned in the VO instructions), because it made more sense to me. If I had started from the stem end and eventually the grip needed to move, say by 1mm in or out, I doubt it would have been possible after all the tightening (considering the friction of the tape layer).

Find the middle of the thread and pass each needle from the top through the first hole on each side. Then pass each needle from underneath through the first hole of the opposite side . You have the first stitch in place (a parallel one) and you are ready to go.

TIP: If a side of the leather shifts upwards, correct with your thumbs.
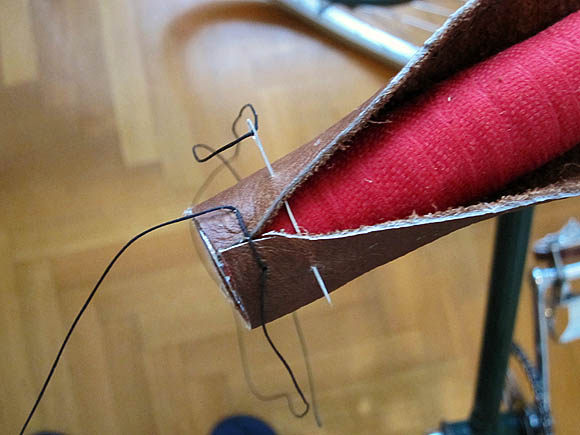
Repeat the following till you reach the last pair of holes: Pass the first needle from the top to the first available hole on the other side (this is a diagonal move) and then exit from underneath the hole across (this is a perpendicular move). Do the symmetrical move with the second needle. Tighten after both needles have moved by one hole.


Keep working with one needle at a time. X-es will be forming along the way.
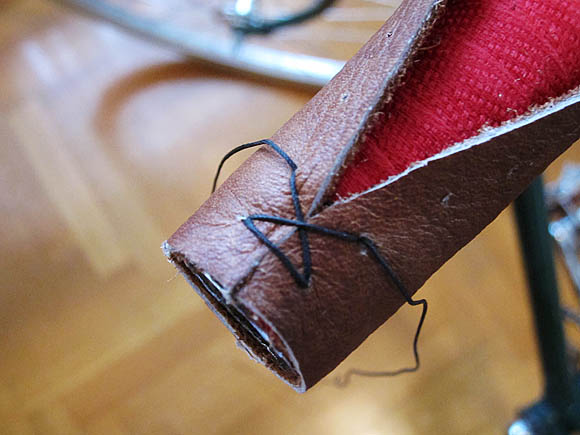
When you reach the end, pass each needle from the top into the last hole on the other side, so that they exit under the leather. Use the two strands to make a knot, cut off the excess thread and tuck the knot under the leather.
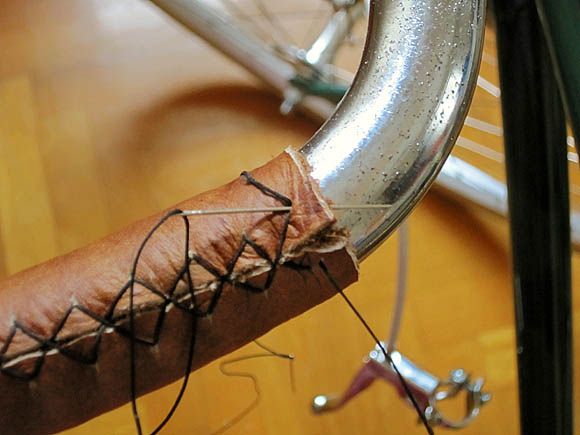


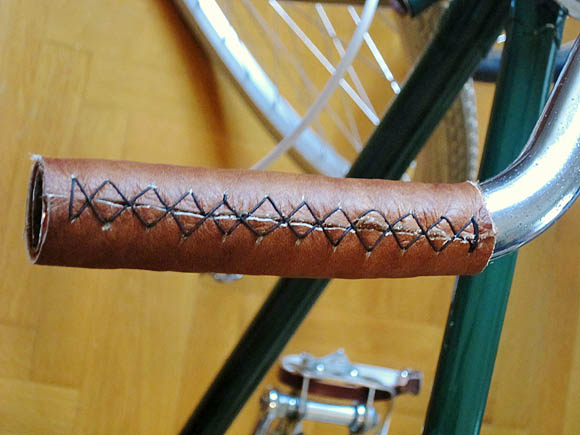
To finish it off, apply some leather proofing (the same you use for your saddle).
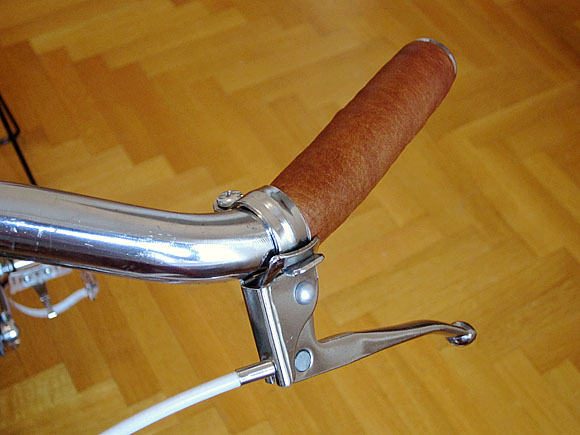
That’s it! Flip the handlebars, move the shifters/levers to their original position, tighten, done!

8 comments on DIY Leather Grips
Thank you very much for your diy grip tutorial – this is going to be of so much use and will certainly add to my Raleigh rebuild! Thank you 🙂 cd
Thanks for the excellent instructions. A couple lessons I learned while following them. Cutting squirrely substances like leather (also fiberglass insulation) is much easier with a board, ruler, etc. pressed down on top. Also serves as a guide for a straight cut. Keeps the leather from pulling.
I’m also a fan of the drill for holes in leather. I set up the pieces of leather on a scrap board (folded in half, so I was drilling both sides at the same time). I clamped a metal ruler (actually my calipers) on top with c clamps and drilled holes every 10 mm per your instructions. 1 minute job and the holes are easily visible.
Looks like just the sort of thing I need on my Pashley…just wondering what you used as bar ends? I was thinking of using wine corks…
Hi Glen. I got a pair of NOS chrome plated end-plugs on ebay. They fit by tightening an expander nut.
Thanks so much for the great tutorial. I am actually trying to accomplish this on my motorcycle bars, which is more or less the same process. I was wondering how leather (due to its stretch-when-wet properties) holds up in the elements? I live in Miami, FL and it rains quite often certain times of the year, and my motorcycle is out in the rain just as much. I would imagine that the leather proofing that you speak of protects the leather from the elements? Where can I buy such leather proofing? Thanks in advance!!
Hi, Erik. I happen to use Brooks’ Proofide, though I assume any leather proofing wax/oil would do the job. It does not have to be bike-specific. You should be able to find something at a shoe store. Btw, I avoid riding this bike in rain, so I cannot attest to its performance in wet weather.
What do you mean by cotton tape? Is it adhesive on one side?
Yes. Search for “cotton handlebar tape” or “cloth handlebar tape”.